Monday, June 11, 2018

Cilantro Lime and Barley Soup


Okay. Let's make some soup. I got a hankering for this soup, that I created while doing a heavy metal detox a couple years ago. Waaay to much Slayer. Just kidding. I was reading up on the chelation properties of cilantro. Pretty amazing stuff. Cilantro does help leach those heavy metals from your body. Anyways, I tried to recreate the soup, and did a pretty bang on job. As always, change things to suit your own taste buds. It's soup. Not rocket scientology. This yields a big huge pot of soup.

INGREDIENTS
  • 1 white onion, diced
  • 3 garlic cloves, minced
  • 3 stalks of celery, diced
  • 1 poblano pepper, diced
  • 1 bunch of cilantro, chopped
  • 1 cup of uncooked barley
  • couple tablespoons of olive oil
  • 4 limes
  • a bunch of bone in uncooked chicken (I used 6 thighs with bone in and skin on, use a whole chicken if you want. Just make sure it has the bones)
  • salt
  • 48 ounces of liquid (you can use straight water, you can use a mixture of organic chicken broth and water- just use that much liquid. I really slow cooked my broth, so I didn't need the added flavor of additional broth. But you do you)
  • 2 ears of fresh sweet corn- kernels cut from the ear.

Cook your cup of barley separately, according to instructions on bag. Time will vary greatly depending on if you get quick cooking barley or not. I did not use quick cooking, so I cooked mine for 45 minutes, while my soup broth was cooking. When barley is finished, set aside. In a large stock pot, put in your olive oil, onion, garlic, celery, and pobalno and salt liberally and really sweat it out. Cook for about 5 minutes or so. Get those liquids released from the veggies. Add in your liquid, chopped bunch of cilantro, and chicken. Simmer for a really long time. I did this for about 1.5-2 hours. We are developing that rich flavor in the broth. Remove all chicken. De-bone the chicken, remove the skin, shred the meat and throw back in the pot. Add the barley to the pot. Cook for 15 minutes on a nice simmer. add another good amount of salt. We aren't using any additional salt in this recipe, so don't be afraid of it. Taste your broth, if it tastes a little flat, add more salt. Juice your 4 limes, and throw it in the pot. Thrown in your corn kernels. Cook for about 10 more minutes. Taste to see if it needs any more salt. Remove from heat. Garnish with a few fresh cilantro springs and maybe a few drops of Sriracha. Or a lot of drops.

Thursday, July 6, 2017

Vegan "B"LT


This is a very easy recipe, and perfect for summer picnics. Everyone loves and good sandwich. And who doesn't love a blt? Even vegans can enjoy a version of this sandwich without the bacon, but all of the flavor. This blt uses baked tofu slices for the "B" part of the sandwich. The end result is very much like the flavor of bacon. It is salty, smoky, a touch of maple, and plenty of black pepper. Baking the tofu gives it a nice texture. Let's get our ingredients together to make the "bacon".

  • firm tofu (I use sprouted, organic, extra firm)
  • soy sauce
  • nutritional yeast
  • maple syrup
  • fresh black pepper
  • olive oil
  • liquid smoke

I really don't follow measurements in this. This is incredibly easy to adjust for your taste. In a bowl, combine a few tablespoons of soy sauce, olive oil, liquid smoke and maple syrup. Add 1 tablespoon of nutritional yeast and A LOT of fresh ground black pepper. The black pepper is really the secret ingredient in this. Taste your mixture. Do you want it more smoky? More sweet? Adjust to suit your taste buds. Very thinly slice your tofu. and set in mixture and marinate for a couple of hours to over night. 
 Next, preheat your oven to 375 degrees. Heavily spray a baking sheet with oil and place tofu slices on sheet. Greasing the sheet is important. This marinade will get sticky on the baking sheet, and not fun to scrub.Pour remaining marinade over tofu slices.  Place in oven and cook for about 15-20 minutes. 

After about 15-20 minutes, before the tofu has completely  turned golden brown, remove from oven and drizzle a bit more liquid smoke over the slices, then a drizzle of maple syrup, then more fresh black pepper. Place back in oven until really browned. About 10 more minutes. Remove from oven, and build yourself and amazing sandwich with fresh tomato slices, lettuce and mayo! Bam! Vegan BLT. Enjoy!

Thursday, June 22, 2017

Angel Hair Pasta with Lemon Chive Sauce


I love going to the Farmer's Market and allowing the beautiful fresh produce inspire me for new recipe ideas. This past Saturday, one of the farm booths had these beautiful bundles of fresh chives with the gorgeous purple chive flowers attached. I knew immediately that I needed to capture the delicate flavor and colorful nature of these chives into a dish. I simply love making pretty food! The flavor of fresh chives is so lovely and delicate. I wanted to create a recipe that enhanced the flavor of the chives without overpowering it. This recipe was born. It just screams summer. 

The fresh chives look like this:


Store them in a cup with water until ready for use. Now let's get our ingredients together and start this dish. It comes together quickly, so let's get to it!
  • fresh chives with flowers attached (if you can  not find chives with the flowers, just use regular fresh chives. The flavor will still be there. You just wont have the pretty factor.)
  • 4 cloves of garlic
  • 3 cups of vegetable broth
  • 1 tablespoon of vegan butter (optional)
  • 1 cup of raw cashews, pre-soaked and drained
  • 4 cloves of garlic
  • juice of 1 lemon 
  • 2 tablespoons of capers (optional)
  • 2 teaspoons of salt
  • 2 tablespoons of nutritional yeast
  • 4 servings of angel hair pasta
  • fresh black pepper
This dish does not take long to cook. I start everything at once. Get the water for the pasta in a pot and get the heat on. Salt the pasta water liberally. While waiting for it to come to a boil, finely chop up several of the chive stalks. I used about 7 stalks. Mine were pretty long stalks. After being finely chopped, it should be enough for a big handful. Like this:

Pour 2 cups of the vegetable broth into a sauce pot and bring to a medium high heat. Add the chives and one tablespoon of vegan butter. The butter is optional. I just like that touch of buttery flavor. Let it simmer away while we work on other things. We really want to infuse the broth with that chive flavor! While that is simmering away, throw your 1 cup of cashews in a blender with one cup of vegetable stock, 2 teaspoons of salt, and the 4 cloves of garlic. Blend for a couple minutes of high until smooth and creamy in consistency. 

At this point, your pasta water should be boiling. Add in your angel hair pasta. Angel hair cooks a lot faster than most other types of pasta. It only takes about 5 minutes, so keep an eye on it while finishing up the sauce. Let that pasta cook until it is nice and al dente. While the pasta is cooking, add the cashew cream from the blender into our sauce pot of chives and veggie broth. add the juice of one lemon, 2 tablespoons of capers (If you don't have capers or don't like them, don't add them! I like the briny bite in this creamy sauce). Add in the 2 tablespoons of nutritional yeast. Let this bubble away while stirring frequently. Your sauce will thicken and be velvety smooth after a few minutes of cooking. When your pasta is finished, drain and put it back into your pot. Pour the sauce into pot with pasta and toss until nicely coated. I cook this dish for one, so I will always have leftover sauce. Don't fret. It freezes really well for future easy dinners! Put pasta onto a plate, and grind a little fresh black pepper onto the top, and then top with some more finely chopped chives and chive flowers. I like to eat mine with some cooked asparagus. I think the flavors go well together. But you decide what you would like to serve it with. Enjoy!

That's all there is to this dish! Easy peasy, lemon squeezy! If you try this dish at home, let me know what you think!

Wednesday, June 14, 2017

Pulled BBQ Jackfruit Sliders

Summer is here! Pulled BBQ Jackfruit sliders are a perfect thing to make for summer bbq's for both your vegan, and non vegan friends, alike! This is another recipe, where you just need to learn the basic technique of the dish, then you can make it countless ways. Jackfruit is so versatile, and is going to take on the flavour of your sauce, but it has the texture of a pulled pork or chicken. You can make some amazing tacos, burritos, sliders, etc....... Just use that beautiful imagination of yours! This recipe, makes a yummy, sweet, smoky, and spicy jackfruit.

Let's grab some ingredients:
  • Canned jack fruit
  • onion
  • garlic
  • bbq sauce
  • ancho chili powder (optional)
  • Chipotle chili powder (optional)
  • liquid smoke
  • veggie broth
  • vegan mayo
  • slaw veggies (I bought a bag of slaw mix- cabbage and carrots)
  • apple cider vinegar
  • organic, unrefined sugar
  • salt
  • pepper
  • dill pickle chips
  • slider rolls (be sure to check carefully for a roll that does not contain milk or eggs! Silder rolls often contain dairy. It was the hardest part of my shopping)
  • peach jam

I buy canned jackfruit. It looks like this:
I drain and rinse the can. It looks like this:
Then I break up the jackfruit a bit with my fingers, so it looks like this:
I sliced up a whole sweet vidalia onion and sauteed with 5 cloves of minced garlic in some vegetable broth. Like this:
Cook until onions are nice and translucent. Then add in your jackfruit. At this point, I added some ancho chili powder, chipotle chili powder, salt, black pepper and about a tablespoon of liquid smoke. Add your spices to taste. I like things spicy! Use any other spices or substitutes you wish! I really wanted a smoky and sweet flavour today. I added in enough veggie broth to almost cover the jackfruit. Then I covered and simmered, stirring every now and then,
While this is simmering away, I made my cole slaw. For mayo, I use the Just Mayo vegan mayonnaise.
I take my grated slaw veggies, and threw in a few tablespoons of the mayo, a tablespoon of apple cider vinegar, a tablespoon of organic and unrefined sugar, salt and pepper. Your basic cole slaw recipe. Adjust to how you like it.
When jackfruit has cooked for about twenty minutes, I take a potato masher to it, and get it broken up even more. Like this:
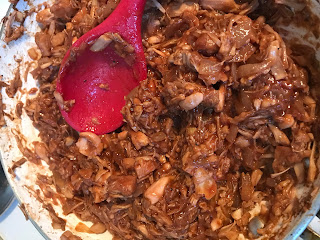
Now the fun part. I added some bottled bbq sauce. Use whichever one you like. I added about a 1/2 a cup to a cup of sauce for the each can of jackfruit I am cooking. I happen to be obsessed with the Palisade Peaches here in Colorado, so I also added a few healthy spoonfuls of Palisade peach jam! I love the flavor of peach in with my bbq sauce. Stir over heat until incorporated and hot throughout. Taste and adjust accordingly. It will look like this:


Now take your slider buns, and first put down a layer of dill pickle chips, then some jackfruit, top with a dollop of slaw, then your top bun. Make a bunch of these! They will disappear quickly!


Spicy "Tuna" Vegan Sushi


I crave sushi ALL THE TIME. I make it at home at least once a week. One of my favorite things about sushi is the flexibility of it. I have never been one to follow a recipe to the letter. I enjoy being able to customize my sushi rolls for whatever is fresh, in season, and just generally yummy sounding. And spicy things are always yummy sounding to me. Today, we are making vegan spicy "tuna" rolls. Instead of tuna, we are going to use a nice and firm tomato! Let's get our ingredients together:

  • sushi rice
  • rice wine vinegar
  • mirin
  • organic, refined sugar
  • salt
  • nori sheets
  • whole tomato
  • sesame oil
  • green onions
  • tamari or soy sauce
  • Sriracha
  • Blanched asparagus (optional)
  • cucumber matchsticks
  • avocado slices
  • sesame seeds (optional)  
  • wasabi 
Let's get started on the rice! Sushi rice can be as complicated or as easy as you want to make it. Sushi apprentices in Japan can spend up to 10 years just making rice before they get to graduate to forming the sushi rolls. You do not need to dedicate your life to the sushi mat to learn to make good sushi rice. The proper type of rice is very important. you need a short grain, high starch rice. Luckily, we have sushi rice in the bulk bins right at our local health food store. The first step, is rinsing the rice. I throw my measured rice into a sieve and rinse it until the water runs clear. Then I dump it in the rice cooker. Basically, just get your rice cooked  by whatever your preferred method. Let's get that rice cooking, while we start preparing our tomato.

Next, we are going to grab our tomato, and lightly carve an "x" into one side. Like this:

Then, we are going to toss that tomato into a pot of boiling water. Just for a couple minutes!


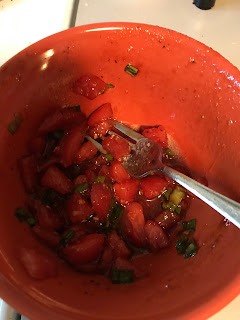
When the tomato skin starts to peel around the "x", take out of boiling water and immerse in ice water to stop cooking. Peel tomato, quarter it, scoop out the wet seeds from the inside, then dice up tomato flesh. We are going to throw that diced tomato into a bowl with a marinade of soy sauce, a small dash of sesame oil (a little bit of that stuff goes a long way!), sliced green onions, and loads of Sriracha (depending on how spicy you want it!)
Let this mixture sit and marinate while the rice cooks and we prepare the other veggies.
I like to blanch a few  stalks of asparagus.
I sliced cucumber up into matchsticks and sliced some avocado! 

When the rice cooker is done with it's cycle, I move the rice into a big bowl with a lid. For this recipe, I used 2 cups of uncooked rice, which made about 4 cups of rice. In a coffee cup, I am going to pout about a quarter cup of rice wine vinegar, a teaspoon pf salt, and a tablespoon of organic, unrefined sugar. I also added a dash of mirin. The mirin is not necessary if you do  not have any. I heat up the vinegar muxture in the microwave for about 30 seconds, stir, and then drizzle over the rice. I lightly fold the rice, and put the lid of the bowl back on and allow it to sit and steam in the bowl and cool down for about 10 more minutes.
The I am going to drain the marinade from my tomatoes!

Always wrap your sushi mat in plastic wrap! It just makes life easier. I am not going to go into tons of instructions on rolling sushi. Their are hundreds of videos on YouTube that explain it better than I ever could. Let me just say, it really is not very complicated. If you do not have a sushi mat, you can roll sushi in a tea towel. You can YouTube that, as well!

Here is my nori sheet, shiny side down! I only ised half of a nori sheet per roll on these. I don't like my sushi pieces to be HUGE. I prefer the one bite variety. So, I use half a sheet at a time.
Spread your sushi rice over the nori sheet. Sprinkle with sesame seeds (optional). The flip over the nori sheet, so the rice side is down.

The fill your roll! Here, I used our spicy tomato mixture, cucumbers, and avocado.

Roll until you are out of rice with different combinations of your veggies. Today, I used asparagus, and green onions, as well as my tomato, cucumber and avocado. I set each roll aside until they are all rolled. The trick to getting pretty pieces of sushi, is to use a very sharp nice, and wipe off the knife blade with each cut. The starchy rice will make the knife sticky. I wipe the knife of with a warm, damp cloth between every cut. Don't worry about it  being perfect. Serve with wasabi and soy sauce (or tamari, or Bragg's Liquid Aminos) and enjoy!

Cilantro Lime and Barley Soup

Okay. Let's make some soup. I got a hankering for this soup, that I created while doing a heavy metal detox a couple years ago. Waa...